
Cover, Flanking, and Environmental Damage
Understand hit calculations, full vs. half cover modifiers, flanking angles, elevation bonuses, and knockback wall impacts in Star Wars Zero Company.
On this page7 sections
Combat in Star Wars Zero Company is defined by positional geometry. Trading blaster fire directly into fortified enemy barriers leads to depleted ammo, wasted AP, and unnecessary squad injuries. Mastering the mechanics of cover protection, destructive ballistics, flanking angles, and elevation modifiers is essential for clearing missions efficiently on higher difficulty settings.
Cover types and defensive modifiers
Cover in Zero Company modifies incoming hit probability, critical strike chance, and graze damage. The targeting reticle dynamically calculates these modifiers based on the line of sight (LOS) between attacker and defender:
| Defensive State | Icon | Hit Chance Penalty to Attacker | Critical Chance Modifier | Armor & Damage Mitigation |
|---|---|---|---|---|
| Exposed / Flanked | Yellow Shield / Broken | 0% Penalty (Base Aim) | +30% to +50% Crit Chance | Full incoming damage; vulnerable to instant knockouts |
| Half Cover | Half Shield | -25% Hit Chance | Normal Crit Resistance | Softens near-misses into partial Graze damage |
| Full Cover | Full Shield | -45% Hit Chance | High Crit Immunity | Shields completely against direct projectile sightlines |
| High Ground (Elevation) | Upward Chevron | +15% Aim Bonus (Attacking Down) | Elevated Crit Threshold | Partially negates lower-elevation Half Cover benefits |
Tactical Hit Chance & Cover Simulator
The geometry of flanking
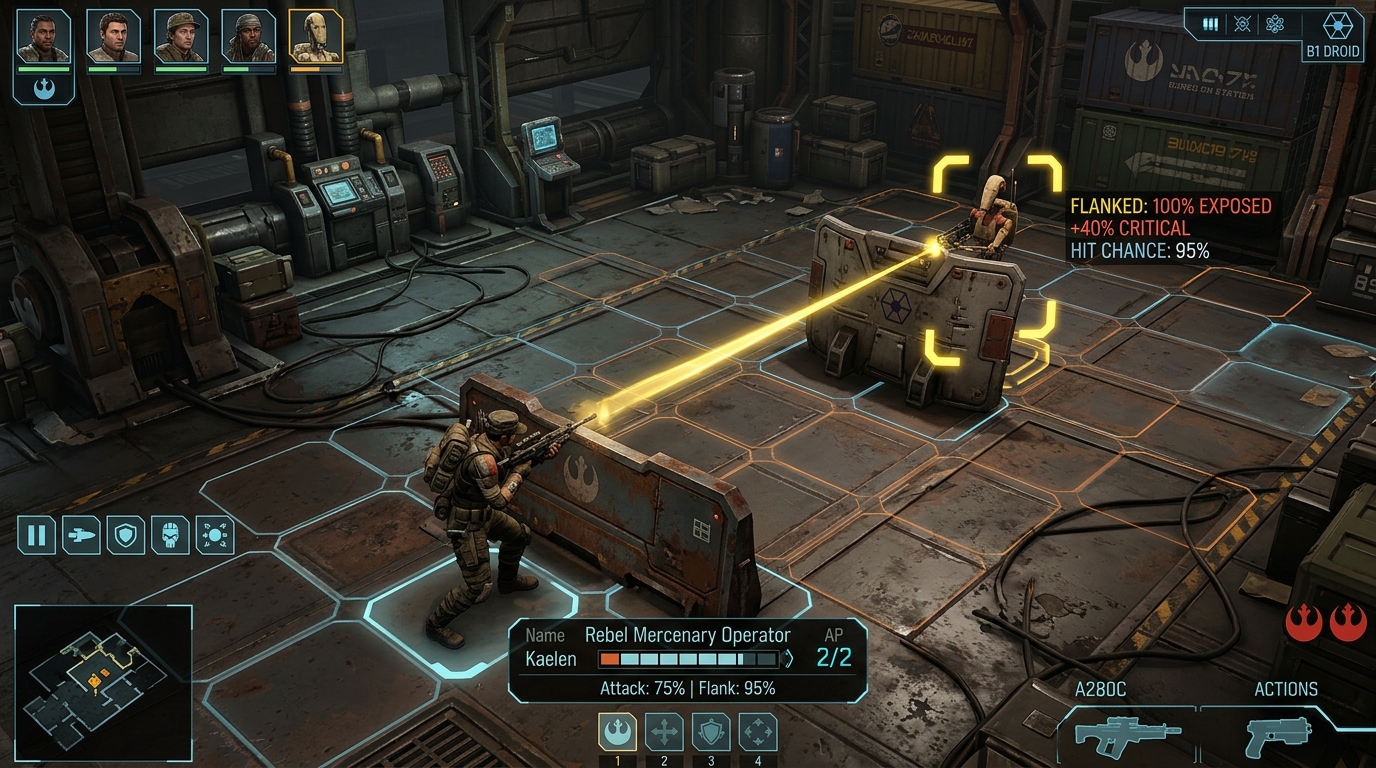
Tactical HUD Breakdown: An operator flanks an entrenched droid from outside the 90-degree barrier arc. The targeting bracket shifts to yellow ('FLANKED: 100% EXPOSED'), negating cover penalties and granting a +40% critical strike boost.
A unit only receives cover benefits if the incoming line of fire passes through the protective barrier.
- The 90-Degree Rule: If an attacker maneuvers past the frontal plane of an enemy's cover (exceeding an approximate 90-degree angle from the barrier's face), the defensive status transitions immediately from Full Cover to Flanked.
- Visual Cue: The in-game targeting reticle will shift from red/shielded to a bright yellow bracket, signaling guaranteed base hit percentages and heightened critical potential.
- Mobility Planning: Spending 1 AP on a diagonal maneuver is often worth far more than spending that AP on a direct low-percentage shot.
       [Wall / Full Cover]
Enemy:       [E]
              ▲
              │ (45% Protected)
              │
          [Hawks] (Frontal Attack)

---------------------------------------------------

       [Wall / Full Cover]
Enemy:       [E] ───► FLANKED! (0% Cover Penalty + High Crit)
                       ▲
                       │
                   [Trick] (Maneuvered to Side)
Destructible cover and heavy firepower
Cover is rarely permanent. Battlefield installations, cargo containers, fuel crates, and barricades possess durability thresholds:
- Fragmentation Grenades & Explosives: Detonating an explosive next to structural cover destroys the barrier immediately, converting the target from Full Cover to Exposed within the same turn.
- Heavy Repeaters & Suppressive Fire: Sustained heavy fire can wear down light barriers over repeated volleys, depriving entrenched Separatist droids of their primary defenses.
- Hazardous Explosions: Striking red fuel canisters or explosive conduits deals substantial area-of-effect (AOE) thermal damage while obliterating adjacent physical walls.
Elevation and vertical dominance
Securing the high ground (gantries, rooftops, sniper perches) grants multiple simultaneous combat advantages:
- Aim Bonus: Operators firing from elevated positions gain a flat +15% aim bonus against targets below.
- Cover Negation: High-angle trajectories look down past shallow low-walls, effectively treating half-cover targets as exposed.
- Defensive Distance: Enemies attempting to return fire from below suffer reduced accuracy and range penalties.
Environmental knockback and impact damage
Star Wars Zero Company features distinct collision physics through Force abilities and heavy kinetic ordnance:
- Wall Impacts: When Tel-Rea Vokoss casts Force Push on an enemy standing near a bulkhead, the target collides with the surface, suffering flat kinetic Impact Damage that bypasses standard armor plates.
- Lethal Drops: Pushing or pulling enemies off catwalks or bridge edges causes severe fall damage or instant elimination depending on the map floor height.
- Displacement: Dislodging an enemy from cover with Force abilities leaves them completely exposed to subsequent allied blaster attacks.
Patch 1.1 targeting correction
Patch 1.1 addressed an edge-case bug where diagonal corner-cover peeking occasionally calculated hit chances as full cover despite the target visually occupying an exposed tile. Line-of-sight calculations are now strictly normalized across all corner angles.
Sources
Ballistics, cover tolerances, and collision formulas synthesized from EA's official tactical guides, in-game combat testing, and Patch 1.1 documentation. Last reviewed September 18, 2026.
Continue exploring
Related guides
Mechanics
Master the combat mechanics of Star Wars Zero Company: 3-AP action point economy, cover calculations, elevation advantages, injury cycles, and Advantage synergy.
Action Points (AP)
Master the 3-AP system in Star Wars Zero Company: action point costs, interleaving squad turns, AP refund loops, and avoiding common action traps.
Injuries & Medbay Recovery
Manage the injury system in Star Wars Zero Company: wound severity levels, Medbay healing cycles, roster rotation, and avoiding permanent loss in Beskar Mode.
Updates & Patch Notes
Track verified Star Wars Zero Company updates, Patch Notes, PC fixes, tactical corrections, and guides rechecked for each version.